Lothavor's Legacy
Walkthrough
This walkthrough guides you through the quest mod "Lothavor's Legacy". It covers everything from the main quest to small secrets and explanations of gameplay mechanics. There's a lot of freedom regarding the order of doing things, so your personal path may differ significantly from what's described in this walkthrough. But you can easily jump to the section that describes the part you're currently at.
Hints and spoilers have been made invisible by default - you have to highlight the text in your browser in order to read it. Sometimes there's a whole series of hints, becoming more and more precise. You can unveil them one after another until you got enough information to figure out the rest by yourself.
Highlight the invisible text to the right: This is just an example.
There's also a text version of this document (printer-friendly).
- Hard or Easy?
- The Lost Brother
- Lothavor's Children
- The Chains That Hurt
- Fort Forcewell
- The Maze of Lost Souls
- A Relic from the Past
- (player name) Holmes on Aurora Isle
- The Puzzle Dungeon
- What would life be without romance?
- Jealousy or Possession?
- The Keys to Success
- The Sanctuary
- Meet the Boss, or: The Point of Decision
- Happy Reunions
- The Cult of Vogash-Xothul
- I quit, Boss!
- The sidequests
The first thing you'll be greeted with is a message box that lets you choose the difficulty level. I recommend the "easier" mode, unless you really want a challenge on figuring out things. This has nothing to do with battle difficulty - use the slider in the Morrowind options for that. It affects many things, including how many hints will be given (or how precise they are), the complexity of some of the puzzles, success chances of various actions, and how much effort it takes to complete certain tasks.
The "easier" setting is actually more fun, while the "harder" setting has a more realistic feel. Guidance is very low in that mode, and some of the puzzles are quite difficult, so try this if you're up to a challenge.
Okay, so you've read the Readme and know where to start the quest. You can find Torlof right west of the docks at Sadrith Mora, next to his boat. Talk to him about "that damn island" and he'll ask you to find his brother and take you to the island on which he supposedly disappeared.
However, if you are below Level 10, he will deem the task too dangerous for you, and refuse to take you to the island. Well, if you think you can handle the risk nonetheless, you can still find the island on your own. It's a long way though (HINT- head towards cell 49, 3).
At any rate, it woud be wise to stock some consumables like potions, ammo, repair tools etc. After all, no one knows if he can find enough supplies when he's going on a long expedition - and that craven Torlof has warned you that he won't stay with you once he has dropped you on the island.
On arrival, look around and admire the scenery. If you try to levitate up to get a better view, you'll have the first surprise - levitation doesn't work. Well, there's still a path and some stairs that lead you up.
You reach a small settlement on top of the western island part, where some people are hanging around on the plaza. Talk to at least one of them. Each one has his/her own personality, and the first dialog and responses to various topics are different for each NPC. You get some choices to answer, but don't worry, there's nothing you can do utterly wrong here. This introductory dialog mainly serves to give you a hint at the NPCs' personalities. Be nice to those you like, buff off those you're disgusted at - a good field to roleplay here.
HINT: Of course, keep in mind that people are more likely to offer help or give out information when they're on good terms with you.
HINT 2: If you're playing a male character, in order to progress at some point it's required that at least one of the women has fairly high disposition and attention values towards the player. The required threshold depends on difficulty setting.
EXPLANATION: "Attention" is a measure of, well, the attention you payed to that NPC so far. It's different from disposition gain. For instance, a failed Admire attempt always raises Attention, while Disposition will go down. Attention always rises a little bit when you talk to the NPC, and more by positive multiple choice answers, accepting and completing a sidequest, or persuasion attempts. In "easier" mode, it should be possible to gain most of the required values by doing the character's sidequests and individual dialog, with no or only little admiring needed. But even if your character sucks at Persuasion, it's no big deal: when Attention is high, Disposition will rise slowly by itself.
When you ask them about Ragnar Sigurdsson (provided your character "knows" of him), they'll direct you to Hjolgar, who had a fight with him last year. He tells you that he had knocked Ragnar unconcious, who was then carried away by their father's servants. Asking them about "our father" reveals the name of the island's owner: a mage named Lothavor.
In case to decide to pay that mage a visit now, follow the winded path up across the upper plaza and past the lighthouse to the bridge that spans the large cleft. You'll get attacked by a particularily nasty sort of cliff racers that cast lightning spells. You may fight your way to the fortress, or retreat for once - it's up to you.
If you go back to the settlement, just talk to some more of the NPCs, and explore the buildings. You'll notice that they don't like you visiting the bedrooms of the opposite sex, or even sleeping in their beds. They also go around their daily schedules, so you won't always find them in the same place.
You may already have got one or two sidequests, or some multiple choice dialog. Note that none of those quests are required to be taken or finished - they're only there for (a) entertainment, and (b) to give you a chance to raise the NPC's disposition and attention. I've listed all the available sidequests and dialog here at the end of this guide, along with their solutions.
Tired? Then seek a bed or resting place and sleep. When you sleep for more than three hours, you'll have a strange and foreboding dream - what does that "Hehe, you're mine!" mean?
HINT: There are five dreams in total. You don't need to have them, but they can be informative, and they add to the immersion. For all the other dreams you must already have had the first one:
- Sleep in the Guest Tower. Your character must have heard of Ragnar Sigurdsson.
- Turn one of the "Discarded Beds" in the dorm tower basements and sleep in it. You must already know Lothavor's name.
- (Any sleeping place) You must have solved at least one of the four trials (see below).
- (Any sleeping place) As a male PC, some days have passed or you already achieved a lot of things, but you haven't made many efforts to get on good terms with one of the women yet. This is a reminder that can occur repeatedly.
Leave the settlement. A strange feeling of sadness and regret overcomes you (you may already have got that message before). Hey, what's that? You're a cool and strong hero, you aren't prone to such sentimentalities at all! Well, nonetheless you do feel that sadness - and if you ask yourself whether some foul thing is happening to you, you hit the spot. Try to swim out on the ocean - after some distance, your feelings worsen so much that they actually begin to hurt you. If you like it or not, you are effectively trapped on the island.
When you ask one of Lothavor's children about that (topic "pain curse"), and keep insisting, the vehement reaction only confirms your suspicions, but you cant get any real info out of them.
HINT: If you try to use teleportation magic to escape from here, you'll notice that it doesn't work either. Okay, there's Barilzar's Mazed Band and other scripted teleportation stuff from various mods, but using them is NO good idea - remember, the health damage increases with distance from the island...
Okay, so now you have more than one reason to get to the bottom of the island's mystery. Head to the fortress, fight the storm racers (hopefully you took enough missiles with you), and enter the courtyard. As if there weren't already enough of the racers, a skeleton crawls out of the ground and attacks you. Well, you've already smashed enough of them in your career...
Fine, you have conquered the courtyard now. To be honest, it looks a bit unfinished and disorderly here. There are four different buildings. The two guardhouses near the entrance hold nothing special, just a few ill-tempered Daedric baddies (could they be Lothavor's "servants"?). Exploring all the rooms, you get the expression that construction had been aborted out of some reason.
The large entrance on the north side is locked. You see four strange keyholes in the door, but you don't have any of the keys (provided you didn't already solve one of the trials). The seasoned RPG player you are, you know with absolute certainty that this is the door you have to pass if you want to proceed.
The last building looks like the typical mage tower. So you'll possibly find Lothavor there. On entering, you get attacked by a Dremora named Marduk (obviously Lothavor's personal guard). He's a rather tough one, so be prepared.
The corpse impaled on a spear has something in his eye... so someone had tried to assassinate Lothavor, but obviously failed.
HINT: If you need some decent armor, look into the crate below it.
Upstairs you reach Lothavor's study room, but the mage isn't there. You can find "Lothavor's Wisdom of the Week" hanging near his bed, which is an important hint for later in the game (in "easier" mode it's a bit more precise, and there's another hint note hanging behind it). On the desk lies the first volume of Lothavor's Journal, vol.2 is inside the desk (beware the trap!). Reading the journal isn't absolutely necessary, but HIGHLY recommended. These books are the main source of information on the island's background story, and some things may remain somewhat mysterious to you unless you've read about what happened in the past.
The summoning circle in the center of the room is functional, but you won't get a clue how to use it until you've received a certain sidequest.
HINT: If you want to save yourself some extra running around, take the books "Aldmeris Dictionary" and "The Real Barenziah, Vol.5" from the bookshelf as well.
That's all you can get for now, so you may return to the settlement. Ask someone about "sanctuary keys", and you get told to search the whole island for the keys (depending on what reason you state, and his/her disposition towards you).
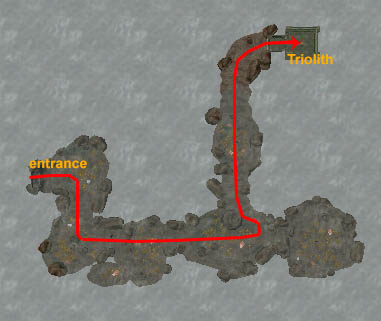
Time for some exploration. Near the southern end of the cleft there's a cave door underwater (in easier mode, you get a message when you are near). Enter the cave and make your way to a strange glowing triolith behind a door. The correct path isn't exactly hidden, but it can be difficult to discern nonetheless, so refer to this picture. Then activate the triolith.
Whoops, a teleporter! You get a (not overly friendly) welcome greeting from a ghost. The other spectres don't seem to like you either, but at least they aren't hostile. According to what they're telling you, you're going to be trapped in this area forever. Okay, there's been no dungeon you haven't escaped so far, so you still hold your hopes up and start to explore the maze.
There are a lot of spell traps hanging on the ceiling that will fire off when you are near. You can't sleep here because of all the spectres around. This is where Torlof's Balm Ring comes in handy (especially for low level characters). And btw, there's a lot of arrows in one of the barrels in the northern part of the maze.
HINT: There's actually no exit from the maze right now. Keep running around, and listen if there's any change in the tone of the spectres' words. They seem to be quite (but not extremely) hateful at first...
HINT 2: When you play in "easier" mode, you can find a note in the southeastern corner of the dungeon that will tell you how to proceed.
HINT 3: You have to patiently take the spectres' taunts and insults. This way their hateful attitude will slowly turn into respect and friendliness. Each time you kill one of them, their hate will grow until they virtually breath fire and brimstone, and it will take a long time until they calm down again. Once they've become quite friendly, take a last round through the dungeon and then return to the point you started from.
Wow, you made it out of here, and you even received a power that can only be called "uber". Too bad that you can't return to Vvardenfell right now and make all those puny foes tremble before you... (*evil laughter*). And don't forget to pick the key from the altar - yes, you guessed it, it's one of the keys for the sanctuary door at the Fort.
While you're outside, explore the coast further. On the east side of the island, above the remains of an old house, you can see something at the base of the mountain slope (again, you get a message in Easy Mode). Keep yourself close to the mountain, and you can climb up to that spot. Apparently it's an old entrance, blocked by a rockslide.
HINT: When you tried to "activate" the rockslide, you can ask the people about it. The hint you get is more precise in "easier" mode.
HINT 2: You need a Miners' Pick to make your way through the rocks. You can find one in the Dock shack, one in the Men's Quarters basement, and some of the courtyard skeletons are equipped with them as well.
HINT 3: Equip the pickaxe, ready it, and simply hack away. :)
In the tomb you find (beside the usual guards and loot) an old book lying on the ground. Take the middle corridor to find it. You can't decipher anything yet, because the text is hardly legible after all the years, and written in an unknown Aldmeris dialect as well.
HINT: Lothavor's children, asked about "Ancient tome", will direct you to Lothavor's tower, where you might find some helpful books.
HINT 2: The book you're looking for is the "Aldmeris Dictionary" on the top bookshelf. Of course, in case you already carried it around with you, you can translate the book instantly.
Super - a helm, certainly absolutely required, hidden on top of the mountains, and levitation doesn't work! Well, there are three possible ways:
NOT-SO-GOOD ADVICE: If you still have a Scroll of Icarian Flight (remember the funny dead Bosmer near Seyda Neen?), you can try to jump up there. But you don't know where exactly the helm is hidden, and that spell doesn't last long.
NOT-SO-GOOD ADVICE 2: Forget about the helm. But that will severely limit your options at a decisive point later in the game.
BETTER ADVICE: Ask Lothavor's children about "helm on the mountains". If disposition is high enough, they'll be willing to help you. But you'll have to wait if the storm racers are still aggressive towards you. Their aggressiveness will decrease slowly over time, so ask again later (when the racers don't attack you anymore).
Maybe the NPCs have told you by now: "Alyssa is really upset. Something has been stolen from her, as I heard.". If you didn't get this news yet, do some other things first, or, if everything else fails, sleep some time.
EXPLANATION: Quests and events don't get activated all at once. There's a sort of delay mechanism that tries to provide a constant "flow" of entertainment for the player. However, setting up a simple hour counter may have left the player either bored or overloaded with quests, depending on how fast he's progressing. So this mod features a "progress indicator" variable that reflects the player's progress.
This value increases slowly over time, but gets incremented through various actions and events as well. It rises a little bit each time you talk to someone, more when you discover something new, complete a sidequest or have a dream, and a considerable amount when you solve one of the four trials. So if you only run around, you'll have to wait for events to occur. If you actually do stuff, things will happen sooner.
Talk to Alyssa. You'll be well guided through this quest by journal entries. So you've got to ask the others about Alyssa's necklace. Choose the topic "jade necklace". Actually you have talk to at least six of the others about that topic, and question at least three of them more intensely (tell them why you think that they may be the culprit).
After that, you get the next journal entry. So you're going to trick the thief into revealing him/herself. But first you have to find a bait, someone who can plausibly claim to have watched the theft. Well, who would qualify for that?
HINT: Faye - after all, she's Alyssa's roommate.
Talk to your "bait" about "jade necklace" (you may have to convince him/her by suspecting him/her first), then to Alyssa. Tell at least two others to stay on the plaza to act as sentries. When the bait, Alyssa, and the sentries have taken their positions, you can start to stir up those who you suspect to be the thief, then enter another building (preferably the Guest Tower) to keep yourself out of sight for a short time.
BIG HINT: Selina is the thief.
If you've told the thief the story you made up, he/she should have entered the Women's Quarters now. Follow there. Alyssa should tell you that she heard hasty steps running down the stairs shortly before you came (if she says that she hasn't noticed anything, you haven't informed the real thief yet). Since your sentries haven't seen anything either, the only possible escapeway is... the door in the basement that had been locked before. And indeed, you can now open that door.
After meeting a funny scamp servant (it doesn't matter what you tell him), you find the thief in the local drug den. Talk to him/her, decide on your answers as you like. It's up to you as well what you report to Alyssa.
There's a trap door in the moonsugar hangout (hidden under some cushions) that leads to the cellars. Cross the two rooms, enter the corridor to the right, and you'll fall through an illusionary floor (the door at the end of the corridor leads nowhere, you didn't miss anything). A few steps further you see a room full of cages. Read the note on the wall - it contains important hints (more precise in "easier" mode). Obviously you have to find a way through the cages by turning the cranks.
HINT: Crucial for solving this puzzle is understanding how the cages work. When you simply turn the crank, the four adjacent cages turn as well, but into the opposite direction; the four diagonally adjacent cages turn the same way as the one you're in. When you push the crank down before you turn it, the four adjacent cages turn the same way as yours, and the diagonally adjacent cages turn the other way.
With a bit of thinking, you'll see that you never can pass from a cage that is open to the north (or south) into a cage that is open to the east (or west). So you can easily rule out paths that won't work for now.
When you activate one of the lanterns, you get teleported back to the first cage. You will have to use this feature in order to make your way through all of the cages.
If you think you screwed things up completely, teleport back to the first cage, exit the cage room (go there where the note hangs), and all cages will return to their starting position.
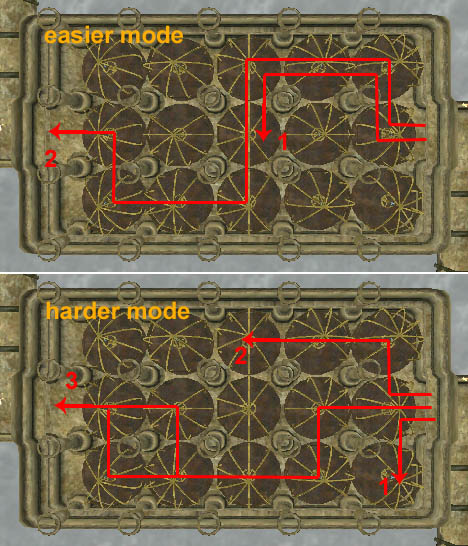
HINT 2: This picture shows the path you have to follow.
HINT 3: These are the exact instructions what to do. Note that the way you turn the cranks can be different, but the path is always the same.
EASIER MODE:
turn left, go north
turn right, go west
turn right, push down, turn right, go west
turn right, go south
turn left, teleport back
turn right, go north
turn right, go west
turn right, turn right, go west
turn right, go south
turn right, turn right, go south
push down, turn left, go west
turn right, turn right, go west
turn left, go north
turn right
HARDER MODE:
push down, turn right, go south
turn left, teleport back
turn right, go north
turn right, go west
turn right, push down, turn right, go west
turn left, teleport back
go west
push down, turn right, go south
turn left, go west
turn right, push down, turn right, go west
push down, turn left, go north
push down, turn right, go west
turn right, turn right
In the next room you find some gargoyle statues, lighted in different colors. Touching one of them, they tell you to talk to their leader, "the unknown one". Obviously that's the one in the center, shrouded in mysterious black. He asks you to discover his true identity - actually he's one of the six other gargoyles in this room. They had hold an election in the past, and based on the others' statements, you are to find out whom they had appointed their leader.
When you are ready to tell the answer, talk to the leader again. But be warned - if your answer is wrong, you get teleported back before the cage room, and you have to make all the way here again!
SHREWD HINT: Saving isn't disabled here. You may save before you talk to the leader, and simply guess down the list. Reload if you are wrong. Well, that's a bit of an exploit, to be true.
HINT: You have to count all dedicated pro votes for each one, subtract the dedicated con votes, and take an additional information from one of them into consideration. The statements are much clearer in "easier" mode - in harder mode you have to do some twisted thinking, particularily on Blue's statement. It would be best to write down a chart with six rows and columns each, and make entries on whether there's been a positive, negative, or undetermined / neutral vote. Remember that no one could vote for himself.
HINT 2: And the winner was... ... ... Yellow!
So you deduced (or guessed) the correct answer, the leader shows his true color, and his former statue disappears. But how to proceed now?
HINT: On the now empty pedestal there's a small switch. Press it, and back in the corridor a wall opens.
In the new corridor you find some potions. It's a good idea to take them, certainly they have been placed here by some nice mod author because they can be useful...
Okay, another jump down deeper into the dungeon. A large cave partially filled with water, a wooden door high above you that you probably can't reach, and a heavy round door. You can't open the heavy door, apparently because the room behind it is flooded, and the water pressure is too strong. So look around some more.
Underwater you can see two passages. In one of them there's a strong current that sucks you into the passage and spits you into another cave. A corridor leads back to the first cave.
Above the second passage there's a sign: "Rare species - do not harm!" It leads to a cave that's home to a shark, who attacks you on sight.
HINT: Do NOT kill the shark (remember the sign?) That nasty critter is your only means of solving this dungeon.
HINT 2: You have to let the shark follow you to the mouth of the other passage until it gets grasped by the current as well. Let you catapult yourself through the bunghole, a short time later the shark gets stuck in it and blocks the current. Now the water starts to rise in the first cave. As soon as the water level has risen above the round door, you can open it.
Congratulations! You have solved the puzzle dungeon. You are rewarded with another power and another key to the Sanctuary door.
At some point Lothavor's children will tell you that they are going to have a party at the northeastern coast that evening (or the next evening). This indicates the start of the "romance" event line. Certain conditions have to be met for this to happen:
EXPLANATION: If you play a male character, you have to have high disposition and attention values to one of the female NPCs in order to trigger that event (talk to her a lot, do her quests, try some admiring). The actual thresholds depend on difficulty setting. If you play a female character, you must have solved both dungeon trials. Then talk to one of the people, and they'll tell you about the party (you get a journal entry as well).
When the time has arrived, go to the spot where the party takes place, and stay a while near the campfire. One of the girls (or guys, if you play as a female) will ask you to dance with her/him. You may have the option to turn her/him down, then you'll get asked by another one shortly after.
EXPLANATION: Disposition and Attention are calculated into a "relationship" value. The NPC with the highest relationship to you is the first one to ask you. If you play as a male, and there are other girls who have at least 70% of the "winner's" relationship, you have the option to turn the first one down, and a short time later you get asked by the next in line. If you play as a female, you can choose from all of the guys (because the male NPCs don't have any quests that could have given you enough opportunities to raise relationship with them).
Dance with your partner, and (s)he wants to walk along the beach with you. Follow him/her, go through the next dialog (it doesn't matter much what you say), and follow back to the campfire. After you got the greeting "Let's enjoy the party some more...", you may stay or leave now - anything important (concerning you) has happened now.
NOTE - Unless you have completed this part, time will stop at 4am. I scripted it that way because I thought the event should happen at that night, regardless of how much the player tarries around. Just in case someone is wondering...
The next event is on the next day, after 10am. When you ask the others about your dancing partner, they'll tell you that (s)he went to the lighthouse. You find your partner standing on top of it, and you have to dispel his worries about his ex-friend (for convenience, I'll be using the male form from now on). It's no big deal when you choose the wrong answers, you just might get a slight disposition hit. When you managed to convince him, he'll be happy and leave the lighthouse.
Act Three, next day (after 6am). When you approach your partner, he'll greet you and says he wants to spend some hours with you alone. Follow him to the manor. He unlocks the door to the basement and leads you into the pool (you both get undressed before). Follow him under the overhang, and a love scene starts.
If you expected some explicit audio/visual stuff at this point, sorry, that's not in this mod, by design. The screen fades out (Nothing to see here - keep moving!), and when it fades in again, everything has happened.
A wall opens magically at the moment of your unition (quite creepy - Big Brother is watching you?), and you receive another power. You have the option to question your sweetheart about it. Again, you can't do anything really wrong here, just roleplay as you like. Depending on whether you disturbed him completely or not, you'll go back either with him or alone. Don't forget to take the all-important Sanctuary key from the altar.
HINT: When your partner offers to make love with you (may happen randomly when you talk to him later), and you deny for the first time, he gives you 10 Restore Fatigue potions. These might come in VERY handy at a certain point in the story, so keep them if you aren't well equipped with those anyway.
When you talk to your partner some hours later, he will ask you to search for his former friend, as he's starting to worry about him. Asking the others, they will tell you to look around the eastern shores.
Go to the house ruin below the entrance to the ancient tomb. The ex-friend is already waiting for you. After a hateful greeting he summons a force field that keeps you both inside, and attacks you. You have no other choice than fighting and killing him - he seems to be controlled by another will, which his own self weakly tries to struggle against, but without success.
After he died, the field disappears, and you find the last Sanctuary key on his corpse. And, following the "one key, one power" rule, you receive another uber power that can vastly boost your fighting abilities.
So you've got the four keys to the Sanctuary door now. Activate the door to put the keys into the keyholes, activate the keys to turn them. Of course, nothing is as easy as it seems, you notice that the keys have to be turned in a certain order. Well, how to figure that out?
HINT: There are only 24 possible combinations. You could use the trial and error method.
HINT: Or you ask, as usual, Lothavor's Children. They tell you that Lothavor is the only one who knows how it works, but if you knew his way of thinking, you might be able to figure it out.
HINT 2: The note "Lothavor's Wisdom of the Week" you found in his tower contains the solution to this puzzle (in a somewhat cryptic form, though).
HINT 3: This is the order the keys have to be turned:
1 - Key from the Manor Basement (love)
2 - Key from the Maze of Lost Souls (patience)
3 - Key from the Cellars dungeon (wits)
4 - Key from your dead rival (fight)
When you try to open the door, your sweetheart appears and warns you about the evil that is awaiting you inside. But you have no other choice anyway, so she asks you to be careful, and you can finally enter the Sanctuary.
Two daedra rush up to you, a weeny Scamp and a (somewhat tougher) Golden Saint. On the floor you see a sheet of paper - the first of the missing pages from Lothavor's second journal. As with the journals themselves, I recommended to read this page and the others you'll find later - they can give you a good impression of the nature of what you'll have to face at the end.
But for now, head straight into the large cave to the north, kill a Clannfear, and look around. This is certainly the place Lothavor conducted his experiments in. In the center of the cave there's a hole in the ground where you can have a look at the ethereal gate that Lothavor described - but pay heed to his suspicions and don't jump down there. On a table nearby lies Lothavor's research logbook - here you can read a detailed list of his experiments on people, and get to know the full names of his "children". Again, this is just informative, ambience, but it sheds a light on the cruelty of his experiments.
HINT: In one of the cages you finally find -hooray!- Ragnar Sigurdsson's corpse. Take his amulet.
Now return to the entrance hall. You can find two doors. The door at the southeastern corner leads to the upper floor. Nothing special there, it just adds to the detail. The northwestern door is the way to go. It leads down to the basement, a smithy (you can pick some repair tools there), and eventually to a new area - the Sanctuary Caves. Simply follow the straight path to the next door.
SIDE NOTE: There's a branch that's almost completely blocked by a rockslide. You can have a peek through it, seeing a sconce and a roadsign. Well, actually you are NOT supposed to go there unless you use the cheat console (hehe...). But better save first before you do so.
Through the next door you reach a magnificent structure - the Sanctuary Spine. It's the area you could see through the hole in the experiments cave. You have to follow the open corridor that circles around the shaft. You're going to face some hostile daedra here, and there are those nasty "Energy Forms" that love to suck off your magicka. You can't hit them, they are immaterial.
After three rounds, you reach a locked door. You can't use a lockpick on it. If you try to open it with a spell, it immediately locks itself again. So you have to take the other door that leads you back into the Sanctuary Caves.
There's a small room with a bit of furniture and a bedroll (you can rest here if you are exhausted), and another (last) note from Lothavor lies on the floor. Continue into the cavern, cross the rock bridge, and you reach another room, guarded by Tlenagaivsraan, a large Golden Saint, who tells you that she'll keep you from entering "the most sacred halls of our Lord".
Her attack is rather weak (thank goodness...), but you'll soon notice that she's absolutely invincible. You can't open the door behind her as well. If you need a breather, run back into the cavern part - she doesn't fit through the doorway. So how to proceed?
HINT: If you play in Easy Mode, you found "another Wisdom of the Week" in Lothavor's study.
HINT 2: That note says "If you can't defeat your enemies, try to make them your friends."
HINT 3: Now it's time to start using the powers you acquired.
HINT 4: Use "Irresistible Charm" on her.
Cool - you have passed that point. The next door leads you back to the Spine. If you turn left, you'll get back to the locked door, but from here you notice a switch next to it. As expected, it unlocks the door.
Now for another three laps of running and Daedra-whacking. Same thing as above, you have to take the door to the right and enter the next section of the Sanctuary Caves.
It's quite dark over here, and the path is long and winded. In the first cavern you have to take the rock bridge to get onto the other ledge. Head right, and in the next (even darker) cavern keep yourself to the right as well. Eventually you'll reach another Velothi-style room with a closed door at the end. But this time there's no guardian. Only three different bells on one side of the room.
HINT: The bells are a decoy to detract you from the correct solution. Ringing them 15 times will trigger a poison gas trap, a grate slides down and bars the entrance, locking you inside the room. But at the same time a note is revealed (hanging behind the poison spout) that contains an important hint.
HINT 2: The note says: "He who does not see will have to suffer"
HINT 3: Remember how you solved the problem three storeys above?
HINT 4: Use "True Insight". Now you are able to see a switch floating through the room. Pressing it will open the exit.
Back to the spine. Unlock the door to the left, and go for three more rounds down the spine (you're starting to get the hang of it).
Again into the Sanctuary caves. A short path this time. Soon you meet an oversized Clannfear who attacks when you enter the cave. And of course, there's another of those well-known closed doors...
HINT: You have to kill the beast to open the door.
HINT 2: "Berserk Fury" is the power of choice here. Actually you might be able to defeat the beast without using this power, but it's much easier with it. Aside from the obvious spell effects, each successful hit while you're under Berserk Fury will frighten it until it starts to flee. And more, you deal additional damage when it is in panic. Once you killed it, the door opens.
You did it, the door opened, same procedure, down the Spine, the beasties are becoming harder, the Gate comes closer, ready for the last section of the Caves.
You reach a spot where you get a message "You get hurt by volcanic gases!". Well, doing the right thing shouldn't be difficult to figure out now.
HINT: "Triumph over Suffering". Well, actually it IS possible to survive without that spell, but you need to drink LOADS of health potions. Better save those for later.
Whoa, that really looks like the bottom of hell! But don't admire the fiery chaos for too long... Head to solid ground, kill the second Flame Atronach, and soon you'll be out of the death zone. Now it's a straight way up, and you get to the Spine again.
Final lap, kill two Storm Atronachs, and you stand before the Gate, with no bridge leading across... whoops, there *does* appear a bridge, at least sort of. You have to do a little jump'n'run sequence here. Arrived safely on the other side, it's a good idea to save now.
HINT: Now it's a good moment to equip the Helm of Iron Will.
HINT 2: You may consider your strategy before you approach the end boss. If you don't plan to fight him, it will be best to take off the helm and hide it somewhere. Otherwise, you'll have a hard time later to retrieve it again.
Walk along the passage to the large cave at the end of it. The lord of these halls will welcome you by kindling all the lights when you arrive (what a honor!). You see someone hanging above him who doesn't look to be very happy in his current situation. Yes, it's Lothavor. Walk up to the Daedric Lord, Vogash-Xothul, and he will greet you.
After his initial greeting, you have the option to ask him about various things (why on earth are ALL the big evil baddies always so talkative??). Then choose "proposal", and he'll offer you to enter his service and help him to expand his influence over all of Nirn (duh, the same old boring rule-the-world dream everyone of his sort seems to have).
You have the options to accept his offer, or to turn it down. Note that if you have the helm with you, you have to deliver it to him in case you accepted. In case you haven't found the helm yet, or if you are too weak or haven't got enough supplies to survive the fight, accepting may be the only viable way. This will give you the opportunity to stock up needed items on Vvardenfell, or gain some levels.
If you entered his service, jump to the section "The Cult of Vogash-Xothul" in this walkthrough. I'll continue here describing the "hostile" way.
So you had the audacity to turn his generous offer down? Of course he gets pissed royally, threatens to "dispose of" you, and casts a spell at you. If you didn't wear the Helm of Iron Will at this moment, it's your end - you're under full mind control now, your feet carry you back to the Gate, and you toss yourself into it. Game over.
If you are protected by the helm's powers, he starts to attack you the conventional way. His whip is a nasty weapon, it deals fire and shock spell effects, as well as a good amount of physical damage. It drains a lot of your fatigue as well (simulating the pain it causes), so you'll soon collapse unless you drink some Restore Fatigue potions, or cast a restorative spell.
HINT: If you keep very close to Vogash-Xothul during the fight (as close as collision allows you), there's a good probability that he won't hit you fully, and you receive less health and fatigue damage, and the spell effects won't fire off (after all, a whip is a medium-range melee weapon).
After you defeated him, he collapses and disintegrates in a purple cloud. Lothavor gets freed from his magical cage, falls down, and dies (but being thankful for having been released from his four years long torment).
HINT: You can get a pair of "Boots of Surface Tension" from Lothavor's body.
Earthquakes set in, and rubble pieces start to fall down. It's a good idea to save now (saving will get disabled soon) and make your way back to the surface before everything collapses.
EXPLANATION: The time you have for escaping the dungeon depends on your speed value. If you don't tarry and keep running, you should always be able to make it in 2/3 of the required time.
HINT: With Vogash-Xothul's death, the teleport and levitation restrictions he had laid over the island slowly start to fade. You may try to use a Recall or Intervention spell now. It still doesn't work as expected, but teleports you to a random set of locations inside the dungeon. Nevertheless, you can save a lot of time (and another jump'n'run across the Gate) that way.
If you made it in time past a certain point in the upper section of the Sanctuary Caves, an extremely heavy quake will cave in the corridor behind you. You are safe now, and can save again. If you took too long, you will get buried under the rocks and die. Continue through the Sanctuary Entrance and exit the building.
Outside you meet your partner again. You have the choice to take him with you as your companion, or leave him. The earthquakes have ruined the fortress and the settlement, some buildings have collapsed completely. Part of the bridge has collapsed as well, but your partner gives you a levitation potion when you step on the bridge (don't worry, levitation works now). He also suggests to go down to the docks.
Arrived at the docks, Torlof appears on his boat (provided that he had brought you here), and offers you a ride back to Sadrith Mora. Be sure to have your partner with you, then let him ferry you back. In Sadrith Mora, Torlof thanks you again, and you have a short dialog with your partner (heh, finally you see this mod's title in the game).
Well, that's it. Happy End. You can take your partner with you as your companion, or tell him to stay, as you like. Check the topics "accompany me" and "fighting strategy" to see the options. He has a companion script based on Grumpy's Companion Project v3.1, so it's very difficult to lose him, and he will level with you according to your stats.
Now for the scenario if you entered Vogash-Xothul's service.
Vogash-Xothul orders you to lead all of his "children" down to him. Don't tarry too long, it can become painful... Vogash-Xothul is of the really impatient sort! But the nice chap he is, he has improved the bridge over the Gate for you, so no more jump & run needed.
His children are already waiting for you in the Fort courtyard. Talk to one of them, and they'll start following you. There's nothing left of their former personalities now, it's completely overshadowed by Vogash-Xothul's influence.
Don't worry if they seem to get stuck at the doorways, they're powered by Grumpy's latest companion warping code that makes it difficult to lose them. It may be a good idea to check their number after you entered a new area, though.
Back at Vogash-Xothul's lair, there's now a portal behind him. He gives you some more instructions, then enter the portal. You appear in the Molag Amur region, east of Suran.
Talk to one of your companions. It's important information they tell you, so read carefully. Your goal is to convert as many people to your cause as possible, and build cult sites.
EXPLANATION: You can recruit almost any unique NPC from Morrowind to become a cult member, as well as NPCs from the expansions and any other mod you have loaded! This mod doesn't change any NPC definition by default, and no scripts are attached to them. Their "cult member" status is denoted by setting their Hello value to 41, using the Alarm setting to store finer distinctions in some cases. This system could only conflict with mods that dynamically change Hello (or Alarm) on existing NPCs as well, but there's none I know of.
These are the important topics:
Information and general settings: "recruiting followers", "building worship sites", "state of progress"
Orders for your companions: "accompany me", "fighting strategy"
Dealing with other NPCs: "join the Cult", "cult chores", "my skills"
It would be best to go to Suran at first - head south to the coast, and then west. Your companions aren't much of a help in fighting right now because they have to be equipped first. (Anyway, that's part of the fun in this quest. Normally, once you're pretty high-level, you drop or sell almost everything you find, and with seven companions you finally have a use for all that junk.)
TIP: These are the weapon categories they're best at:
Alyssa, Selina, Thierry: Short Blade
Faye, Arnand: Blunt Weapon
Diane: Marksman
Hjolgar: Axe
Geronimo: Spear
Auto-Leveling is disabled as long as Vogash-Xothul is alive (their minds are too blocked by his control over them to be able to "learn" anything), but when you meet your partner again after you killed the boss, he/she will adjust his stats to yours every time you sleep.
You can do your usual stuff on Vvardenfell as well, but don't neglect your cult duties for too long. Ask one of your companions about "state of progress" in order to learn how content Vogash-Xothul is with your progress. After all, in his eyes you're just another slave, and lazy slaves get punished...
- How to recruit people -
Choose the topic "join the cult". This topic is not available on guards - you can't recruit them (out of technical reasons). If you have chosen the option "I'll always ask suitable people to join" under "recruiting followers", everyone who doesn't have a special greeting will display the option to recruit him when you talk to him.
Success chance depends on a lot of factors, including difficulty setting, disposition, level, willpower, and faction (it's difficult to "turn" an Imperial Cult or Temple member). If you have one of the "Children" with you, you can make them exert their powers on the NPC. This cuts the failure chance in half, but if this still fails, the NPC will become hostile, so use this option with caution!
- Special benefits from cult members -
Having many cult members has more benefits than just making Vogash-Xothul happy. You can request additional "cult chores" from them:
You can tell any member to donate to the cult (to be precise, to you) once a month. The amount of money depends on the member's class, level, and pocket cash (gold in his inventory). Nobles are a particularily good source of income.
Priests, Monks, Shamans, and Wise Women can be ordered to preach your belief, so recruiting new members will become easier.
- How to build a cult site -
Any commoner who joins your cult may turn out to be an architect.
EXPLANATION: The chance is 25% as long you haven't found one yet, 10% after you have already found one, and if you have recruited at least 10 people, and didn't get an architect so far, the next commoner recruited will be an architect in any case.
Ask an architect about "cult chores", and lead him to a place where you want to build a site. It's going to be a big structure, so you have to find a large, fairly planar space without any large object present, and there aren't too many places on Vvardenfell that meet these requirements. Talk to him again when you want to test the terrain.
As a guideline, the terrain is tested from north to south, so if the check is aborted at a low row number, the problem lies north of you. If the check fails shortly before the end, there's probably something wrong to the south. If it stops around row 7, look to the east and west. Often the problem can be solved by just moving a few steps.
A cult site costs 30,000 gold, and will take five days to complete. You have to stay away from the building site for construction to progress. When it's complete, the site has to be visited in order to be registered in the progress count.
When a site has been completed, you can receive a blessing at the statue every six hours.
- Heresy! -
Once you reached a progress count of 50 (1 per recruited member, 20 per site built), the Tribunal Temple will start to get interested in your activities. When you leave a building, a group of Ordinators will show up and tell you to stop your heretic activities. In case you continue, you'll get attacked by groups of Ordinators from time to time.
So you're tired of being an evil cult leader? Want to take revenge on Vogash-Xothul because of his punishments? Feel strong (and well-equipped) enough to face him? Well, there's just one problem... the helm.
If you took the helm off before you talked to him and hid it somewhere, you're lucky. Just take it again, put it on, and go kicking his spotted owl. If you gave it to him, or didn't fetch it at all, things become more complicated.
HINT: When you have given the helm to Vogash-Xothul, and talk to one of his scamp servants, it tells you that the helm has magically disappeared after you left. Where could it be now? An important hint can be found in the notes of its creator.
HINT 2: The relevant passage in the translated old tome is: "hidden the helm... peaks above the Sanctuary. In case he ... it will magically return to that ..."
HINT 3: So the helm is probably back at its original location on the mountains again. But how to get it again? There's none of Lothavor's children around now to call another storm racer for help.
HINT 4: Is there any teleportation magic that works at all on this island?
HINT 5: Play around with the Portal Ring Vogash-Xothul gave you. Try to set the destination near the Sanctuary, read the message, teleport to the portal and back, and see what happens.
HINT 6: You can make use of the disturbance effect that makes the portal teleport you to a spot a bit further away from the courtyard center than you had set it to.
HINT 7: Start from the northeastern corner of the Sanctuary roof (you can get there through the first floor, then take the trap door). Set the destination, teleport to the portal, then enter the portal. As soon as you are in the exterior, immediately open the inventory before you slid down again. Set the portal destination, then teleport to the portal and back again. Repeat this two or three more times. Each time you should end up a bit higher on the mountain, and eventually drop to the spot where the helm lies.
That was easy, wasn't it? ;)
After Vogash-Xothul's death you have to do the same run for escape as described above. Unfortunately the portal is gone as well, and the ring doesn't work anymore. And of course, your sweetheart doesn't await you outside because he/she is on Vvardenfell. But Torlof will show up and take you back to Sadrith Mora (again, provided he brought you here). You'll find your partner where you last left him. He's alive because he hid, hoping that you would return again. But all the others are dead, slaughtered by the Ordinators.
These are the sidequests and multiple choice dialogs for the girls on the island. Remember that none of them is necessary to advance in the main quest, they only give you the opportunity of raising disposition and attention with the respective NPC. You get no journal entries for these, and nothing hints you towards these quests.
Some of these quests become only available when the "progress counter" (described here) reaches a certain value. As a guidline, the "detective quest" is activated when this value reaches 150.
Note that side quest greetings can get superseded by (the more important) main quest related greetings, or side quests may become temporarily deactivated to avoid conflicts.
- Stoneflowers (Alyssa) -
Choose the topic "stoneflowers".
Requirements:
- You must have talked to Alyssa before.
- At least one Stoneflower Petal in your inventory
HINT: You can find some stoneflowers at the southeastern coast of the island.
- Jewelry (Alyssa) -
Choose the topic "jewelry for you".
Requirements:
- You must have talked to her about treasures, and promised to find some more rings and amulets for her.
- Non-enchanted rings or amulets in your inventory.
NOTE: After a certain number of gifts, she will lose interest.
- Listen to her chatter (Alyssa) -
Talk to Alyssa.
Requirements:
- Progress value > 50
- Race to the docks (Diane) -
Talk to Diane when she's standing on the islet to the north.
Requirements:
- You must have talked to Diane before.
HINT: Swimming speed depends on your Speed and Athletics stats (Diane's values are adjusted accordingly), as well as on your encumbrance. So if you're fully loaded, you won't have any chance. So drop your heavier stuff until you are at about one third of your maximum encumbrance, and you should be able to win.
- Silent walk and racer fight (Diane) -
Talk to Diane when she's at the northeastern coast.
Requirements:
- You must have done the race with her before.
- The mysterious scroll (Faye) -
Talk to Faye.
Requirements:
- Progress value > 55
HINT: Faye has found the scroll in Lothavor's study. Perhaps the diagram refers to something in that room. When you talk to Faye about "mysterious scroll", sometimes she tells you that the words on the scroll might be abbreviated.
HINT 2: There's a summoning circle with five candles. There are also some candles in a nearby chest, in case you need more.
HINT 3: You have to place seven candles near the circle's edge, in approximately equal distance do each other ("circ: 7"). The first candle has to be exactly to the north of the center (the circled "N" at the diagram).
HINT 4: Be sure all candles are off. Then kindle them in the order shown by the diagram. If you did everything right, you get a visual effect on the circle when the last candle is burning. If not, put all candles off first, then try again. Double-check that the candles are arranged properly.
HINT 5: Drop the scroll at the center of the circle ("a cent"), close the inventory. The scroll should disappear, and the circle emits sparks. Step back from the circle.
HINT 6: A Dremora appears and asks you for a code number. The clue is the words "Massacre victs." on the scroll.
HINT 7: Remember Lothavor's journal Vol.1, and what he did to the workers?
HINT 8: The code is 28, the number of workers Lothavor had taken to the island, and slaughtered to keep the island secret. If you tell the wrong number, or say you don't know, the dremora attacks you (beware, he's tough!). If you tell the correct number, you get some powerful items from him. Report back to Faye to receive her admiration. ;)
- Foreign lands (Faye) -
Talk to Faye.
Requirements:
- Faye is standing at the docks
- The broken switch (Faye or Selina) -
Talk to Faye (or Selina).
Requirements for Faye:
- Progress value > 100
- Disposition >= 75
Requirements for Selina:
- Progress value > 180
- Rejected quest for Faye, or Faye's disposition < 65
- The sick Storm Racer (Selina) -
Approach Selina when she stands before a Storm Racer near the docks.
Requirements:
- Progress value > 70
- You must have talked to Selina before
- You must be at least 4000 units away from that spot and from Selina (or inside a building)
- Selina must be outside
HINT: You can heal the racer with a potion ("talk" to it), or cast a spell on it.
- The Real Barenziah V (Selina) -
Choose the topic "The Real Barenziah".
Requirements:
- You must have been near the books on Selina's bed (you got a message)
HINT: Volume 5 is still on the shelf in Lothavor's tower (obviously she had missed it there).
- Talk about yourself (all the girls, and Thierry) -
Talk to the person.
Requirements:
- Fairly high Disposition and Attention (depends on difficulty setting)